Art Projects
Easter
Spring
The Activity Room3 Comments
Make DIY marbled Easter eggs with a fun sensory art idea from our Member of the Month, Lana.
Ever feel like all you do is search the internet for things to do with your kids? Then, by the time you’ve found something fun, you don’t actually have time to do anything.
Our Member of the Month, Lana, was right there with you. She was stuck looking for things to do, but never getting to the fun stuff.

Lana loves seeing her little girls, ages 3 and 1, develop as they grow. Hands-on activities are the perfect way for her to do that!
Lana wanted to do hands-on activities with her kids. But there’s almost too much information and too many options out there!
“My biggest struggle was having too many, not having a plan,” Lana says. “I created a list and kept adding and adding and adding. I was overwhelmed!”
Since she discovered The Activity Room®, Lana has the time do fun things with her two girls.
“It’s been such a sigh of relief for me” Lana explains. “Having The Activity Room® really put me at ease and I was able to take a step back. Everything was planned out. So I just had to focus on having the materials!”
Inside The Activity Room®, members can download daily activity plans. Each plan contains step-by-step instructions, a supply list, and helpful inspiration pictures.
“I love outlines and structure, so that was encouraging for me!” Lana explains.
Lana loves having these pre-made plans! It’s made playing with her kids so much easier.
The Activity Room® is so much more than just the plans.
“After joining The Activity Room® I realized it was so much more than that,” she says. “The support from the member community is a great source of support, to push through when I’ve been in a rut.”
When you join The Activity Room®, you also get access to a members-only Facebook group. You’ll meet other hands-on parents, share your activities, and help support each other.
“Talking to other members and having that community support has been invaluable,” Lana explains. “Everyone keeps me motivated and inspired each day.”
Let’s Meet Lana

How many kids do you have and how old are they?
Two girls, 3 years old and 10 months old
How long have you been in The Activity Room®?
Since May 2018
What is your favorite activity you’ve done in The Activity Room®?
Any science experiment, like magic milk or a baking soda/vinegar reaction.
What’s your favorite thing to do with your kids when you get a few moments?
Snuggle. Before going to bed, we curl up on the couch and snuggle.
Sometimes my oldest asks for snuggles before I get a chance! Makes me melt.
What’s your best tip for doing activities with your kids?
Schedule it. Pick a time and commit.
I actually have it pretty easy (for now). I can count on my youngest to nap for a minimum of 1.5 hours in the morning.
That’s more than enough time to complete ANY activity. And if the activity takes us outdoors, we just wait until she wakes up!
If you were to tell a friend about The Activity Room®, what would you say to them?
Before The Activity Room®, I spent a LOT of time searching for activities to do, and not enough time actually doing them.
Now with The Activity Room®, I’m not only doing activities, but I’m really connecting with my kids and making wonderful memories!
Share your favorite quote
Put your positive pants on.
DIY Marbled Easter Eggs Art Activity
We love spring! And this fun Marbled Sensory Art Project is perfect for spring.
My kids love squishing in the colored shaving cream and seeing the cool marbled patterns on their spring shapes.
To make your own marbled sensory art, you’ll
- white card stock
- scissors
- shaving cream
- pan
- spatula
- paint
- skewer/chopstick/butter
knife a straight edge (ruler, squeegee, etc.).
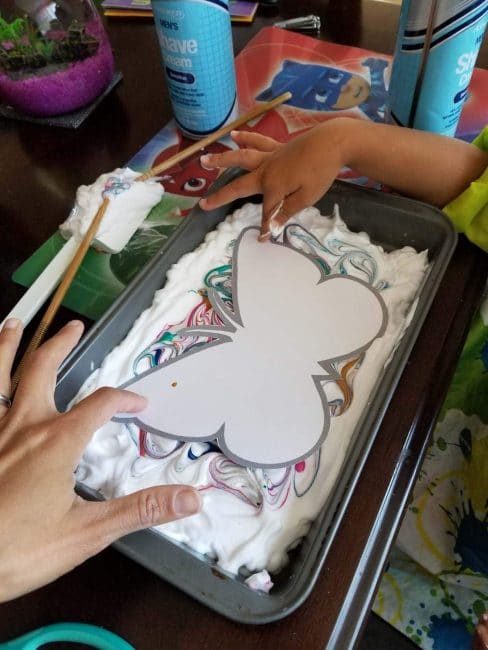
First, cut some spring shapes out of the card stock. We picked butterflies, flowers, and (of course) Easter eggs.
Spray a layer of shaving cream into the pan and smooth it out with the spatula. This just eliminates any air pockets.
Next, drizzle some paint (we used acrylic) on top of the shaving cream. Use your skewer to swirl the colors around until your desired marbled effect.
Then take your spring shapes cutouts and press them into the shaving cream.
We peeled the butterflied away to lay on a flat surface, shaving cream-side up. We placed a large piece of cardboard on the table to protect it.
Finally, use your straight edge to scrape the shaving cream off and marvel at your marbled spring shapes!
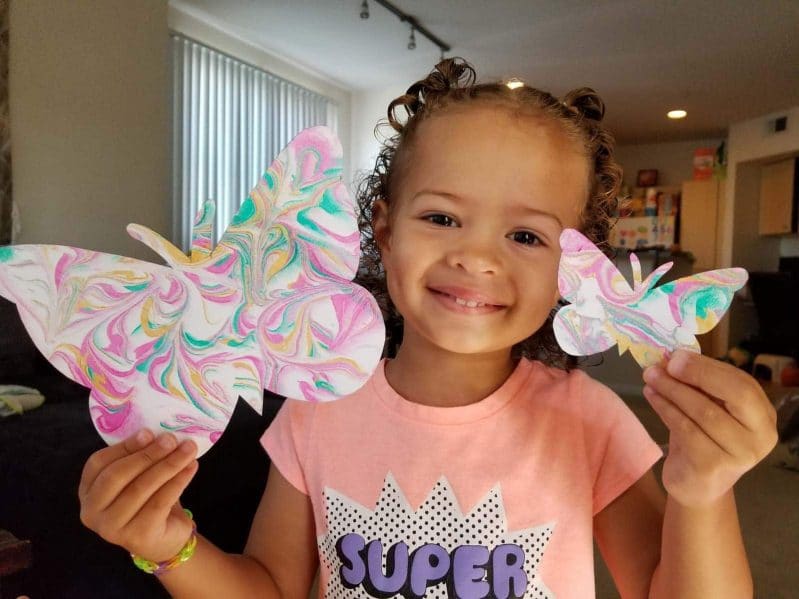
We loved the result so much that we ended up making lambs and flowers the next day!
What’s your favorite way to mix sensory play into your art activities? Share your best DIY sensory art activity in the comments!
WANT TO SAVE THIS ACTIVITY?
Enter your email below & we'll send it straight to your inbox so you can access this activity later! Plus, you'll get simple activities from us every week!

 Enjoy Simple Winter Fun Inside with Easy DIY Homemade Snow
 Easy No-Prep Looking and Listening Activity to Practice Mindfulness
 Simple and Fun Disappearing Letters Chalk Activity for Preschoolers


Leave a Comment